

How to create a steel wristwatch using Corel Draw. The basic technique used in this tutorial is the x, y coordinates position. The x, y coordinates position is very important to obtain symmetrical results. We will also use some gradients to create the steel effect. We’ll work with simple technique to achieve great results.
Step 1
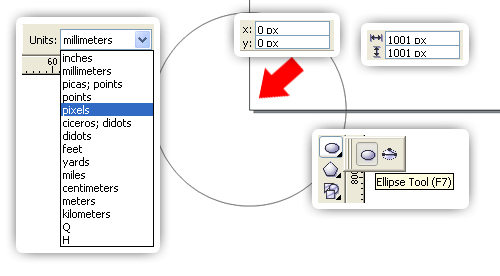
Open a new document. On the toolbar, change Units to pixels. Create a 1001px circle using the Ellipse Tool (F7). Put the x, y coordinates position at (0, 0).
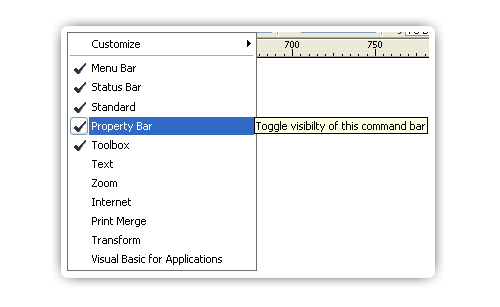
Make sure all this toolbars have been checked.
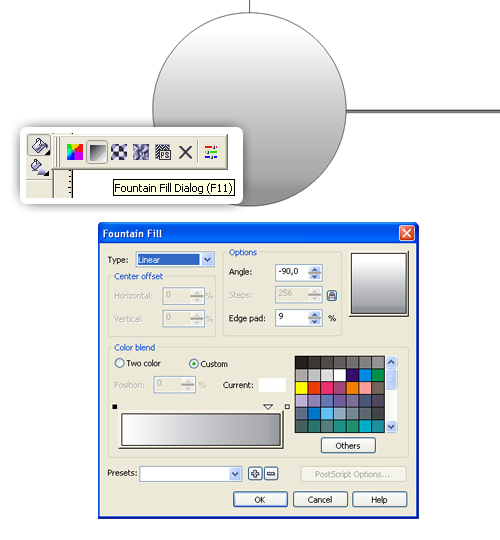
Fill the circle with a Linear Gradient using the Fountain Fill Dialog (F11). Change the Angle to -90°, and the Edge pad to 9%. Then, add one slider in the Gradient Slider. Set the color and position, Start Point at white, Added slider at 30% black; Position at 92%, and End Point at 40% black.
Step 2
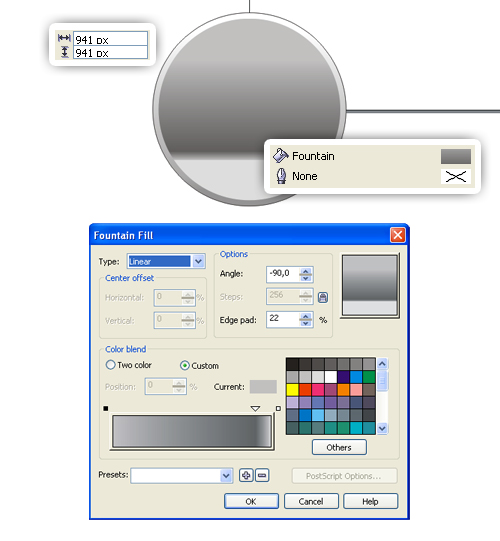
Duplicate the circle using copy and paste. I suggest you do not use Command + D (Duplicate command). This is because we need the object position to remain at 0, 0. Change the circle size to 941px. Clear the Outline Color. Now fill the object with a Linear Gradient using the Fountain Fill Dialog (F11), change the Edge pad to 22%. Add a slider in the Gradient Slider. Now set the color and position, Start point at 20% black, Added slider at 70% black; position at 90%, and End point at 10% black.
Step 3
Duplicate the outer circle. Change the size to 921px, then fill with a Linear Gradient using the Fountain Fill Dialog (F11). Change the Edge pad to 22%. Add two sliders in the Gradient Slider. Set the color and position, Start point at white, First slider at 10% black; position at 8%, Second slider at 70% black; position at 90%, and End point at 10% black.

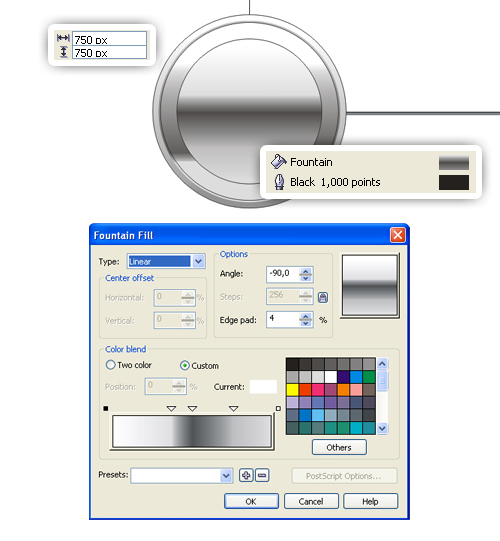
Step 4
Duplicate the outer circle again. Change the size to 750px. Then fill it with a Linear Gradient using the Fountain Fill Dialog (F11). Change the Edge pad to 4%, then add three sliders. Set the color and position, Start point at white, First slider at 10% black; position at 37%, Second slider at 80% black; position at 50%, Third slider at 20% black; position at 76%, End point at 10% black. Open the Outline Color and change its thickness to 1 pt and fill it with a black color.
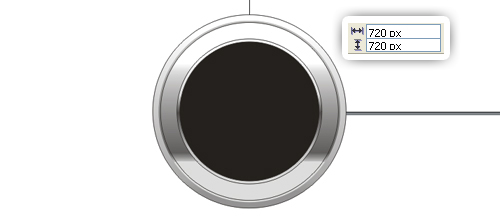
Step 5
Duplicate the latest circle, change the size to 720px, and fill it with a black color.
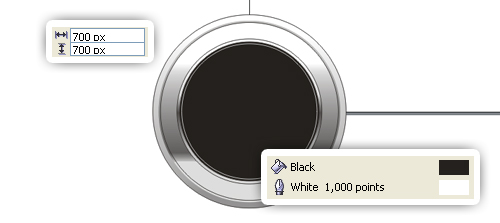
Step 6
Duplicate the latest circle, change the size to 700px, and replace the Outline Color with a white color.
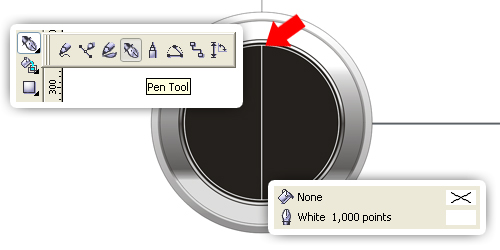
Step 7
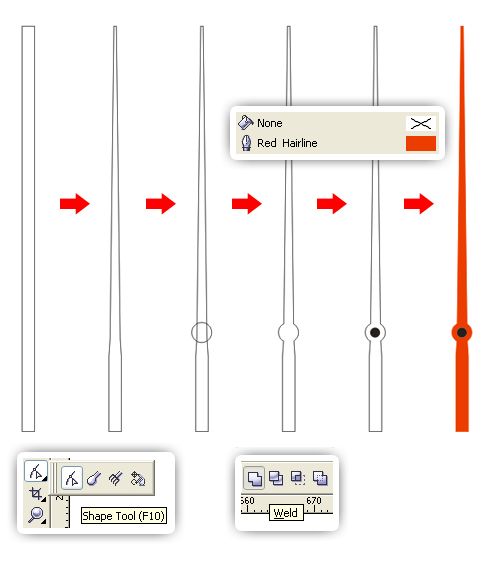
Use the Pen Tool to draw a vertical line in the middle of the circle. Then change the outline thickness to 1 pt, and fill it with a white color.
Duplicate the line, then rotate to 6°.
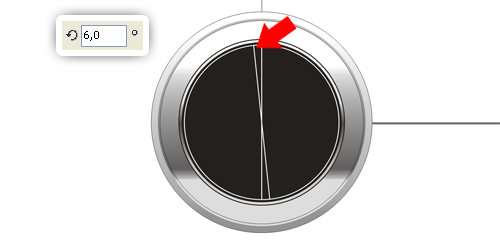
Repeat it again and again, but now rotate each line to 12°, 18°, 24°, 30°, 36°, 42°, 48°, 54°, 60°, 66°, 72°, 78°, 84°, and 90°. The result should look like that shown below.
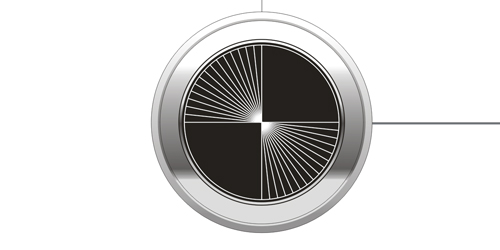
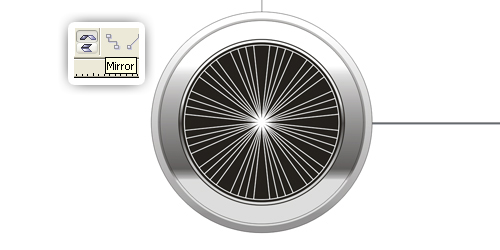
Step 8
Select all lines, then duplicate them. Flip horizontally by clicking on Mirror. Delete the lines at 0°, 30°, 60°, 90°, 120°, and 150°.
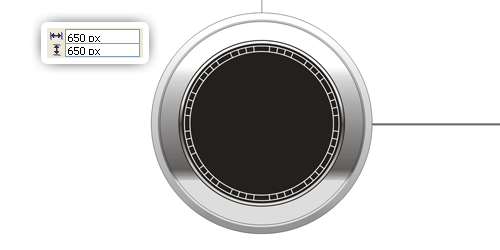
Step 9
Duplicate the latest circle and change the size to 650px.
Step 10
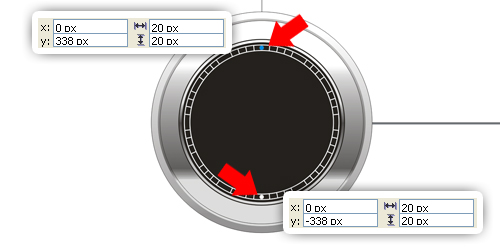
Create a 20px circle, put the coordinate position at 0, 338. Fill with cyan color, then remove the Outline Color. Duplicate the circle, put the coordinate position at 0, -338. Fill with white color.
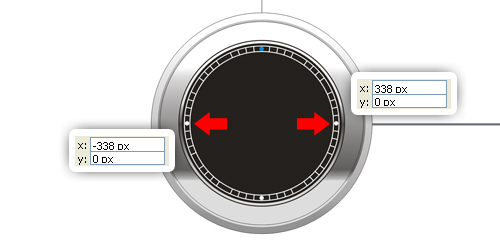
Now select both of them. Duplicate, then rotate to 90°. Change the cyan circle to a white color.
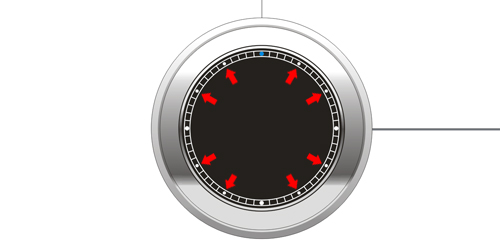
Duplicate again, rotate to 30°, then change the size to 15px.
Do the same, now rotate to 60°, 120°, and 150°.
Step 11
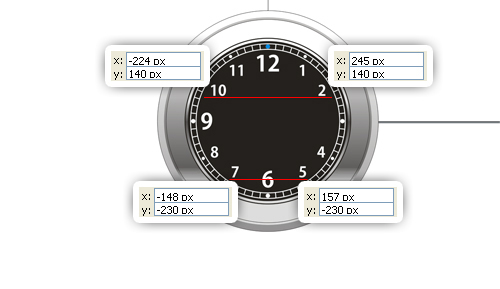
Now let’s put the numbers. To obtain a symmetrical result, duplicate the latest circle, change the size to 610px. Use the circle as a boundary and start typing your numbers. Type the numbers “1-12” except number “3”. I used Kozuka Gothic Pro B for my font, but you can use your favorite font. For number “12,” “6,” and number “9,” the font size is 24, and the rest is 16.
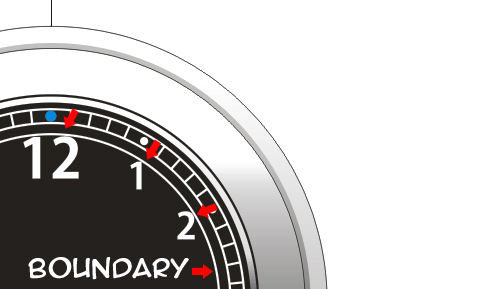
Since each number has a different width, but the the same height, let’s set the y coordinate position for each number, so the numbers will have the same value with their opposite side. See the picture below, number “10” and number “2” have the same y coordinate position, ie 140px. Also, with the number “7” and the number “5,” the y coordinate position is at -230px. Delete the boundary circle.
Step 12
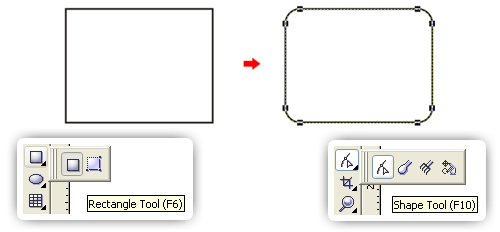
On the empty field, create an 80 px by 60 px rectangle using the Rectangle Tool (F6). Draw a rounded rectangle using the Shape Tool (F10).
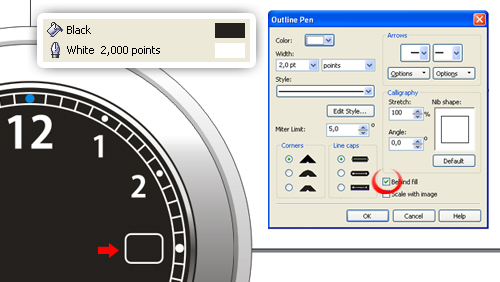
Put the rounded rectangle to the number three position, then fill with a black color. Open the Outline Pen Dialog by double-clicking on the Outline Color and set the width to 2 pt with the option Behind Fill checked, then fill with a white color.
Step 13
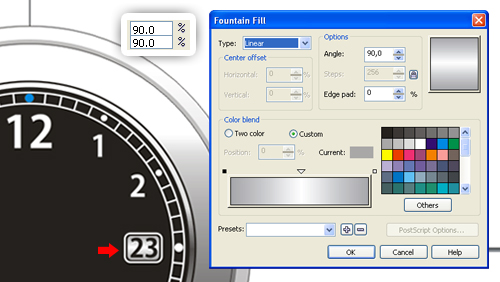
Duplicate the rounded rectangle and scale it to 90%. Remove the Outline Color, then fill it with a Linear Gradient using the Fountain Fill Dialog (F11). Change the Angle to 90°, then add one slider in the Gradient Slider. Set the color and position, Start point at 30% black, Added slider at white; position at 51%, End point at 30% black. Next type the number in the middle. We’re done with the numbers.
Step 14
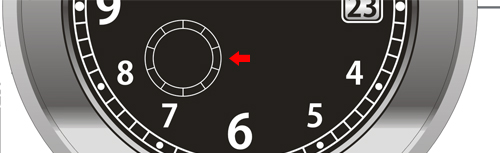
Let’s make the analog stopwatch. Duplicate the two latest circles and lines at 0°, 36°, 72°, 108°, and 144° (you need to redraw the line at 0° because it was deleted before), by holding down the Shift key and click the object one by one, use copy and paste. Select them all, then resize to 160px and change the Outline width to 0,5 pt. Resize the inner circle to 126px. Put it to a position shown below.
Step 15
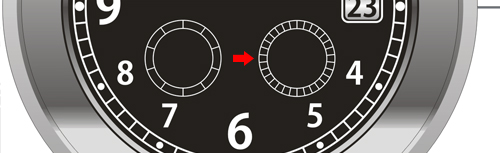
Do the same now with the lines at 0°, 12°, 24°, 36°, 48°, 60°, 72°, 84°, 96°, 108°, 120°, 132°, 144°, 156°, and 168°. Always remember to use the x, y coordinates position to obtain symmetrical result. Put it to a position like pictured below.
Step 16
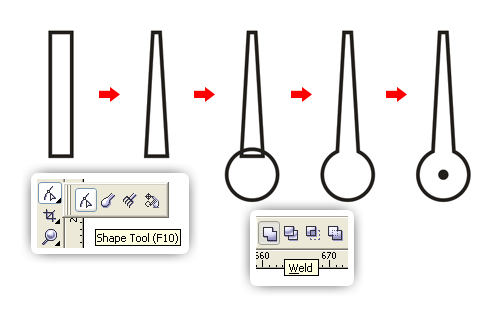
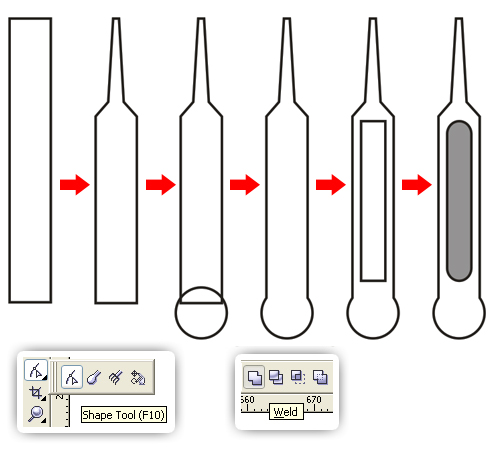
Now let’s make the stopwatch hand. In the empty field, create a rectangle using the Rectangle Tool (F6). Now right-click the object, choose Convert to Curves (Command + Q). Change the shape using the Shape Tool (F10). Create a circle and place it under the rectangle as shown. To combine the two objects, select them, then click Weld in the toolbar. Add a small black circle.
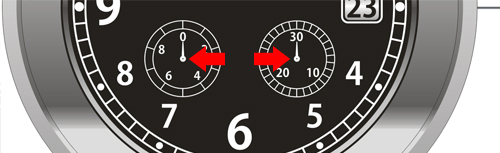
Place it in the middle of stopwatch. Size it to fit the stopwatch circle. Then, type the numbers.
Step 17
Create the Vertortuts logo under number twelve. It’s very easy, I know you can create the logo just by seeing it. Type “VECTORTUTS” under the logo. But you can use your own logo here if preferred.

Step 18
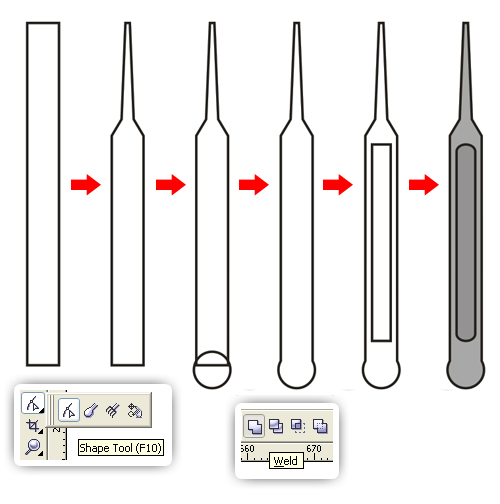
Let’s draw the hand hour. In the empty field, create a rectangle using the Rectangle Tool (F6). Then right-click the object, choose Convert to Curves (Command + Q). Change the shape using the Shape Tool (F10).
Create a circle and place it under the rectangle as shown. To combine the two objects, select them, then click Weld in the toolbar. Add a rectangle in the middle, using the Shape Tool (F10) to create the rounded rectangle, then fill it with a 40% black color. Group (Command + G) them all.
Place it in the middle of watch, rotate to 85°. Use guidelines to help you arrange the object position.
Step 19
Draw the minute hand. See Step 18, but now make it slimmer and longer than the hour hand. Fill it with a 30% black color.
Place it in the middle of the watch, rotate it to 310°. Use guidelines to help you arrange the object position.

Step 20
Last, draw the second hand. In the empty field, create a rectangle using the Rectangle Tool (F6). Then right-click the object, choose Convert to Curves (Command + Q). Change the shape using the Shape Tool (F10).
Create a circle and place it under the rectangle as shown. To combine the two objects, select them, then click Weld in the toolbar. Fill it with a red color, change the Outline Color with a red color too. Now add a small black circle.
Place it in the middle of the watch, rotate it to 192°. Use guidelines to help you arrange the object position.

Step 21
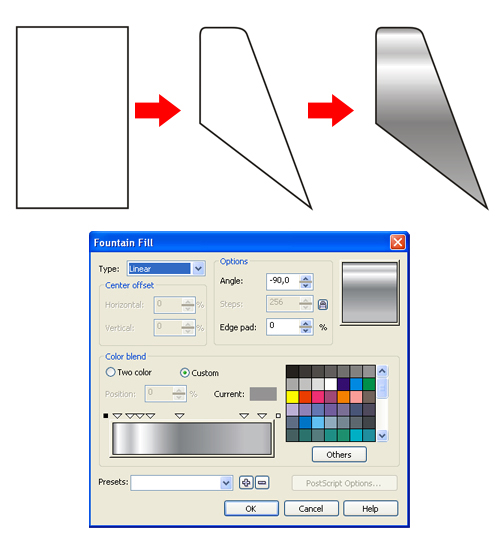
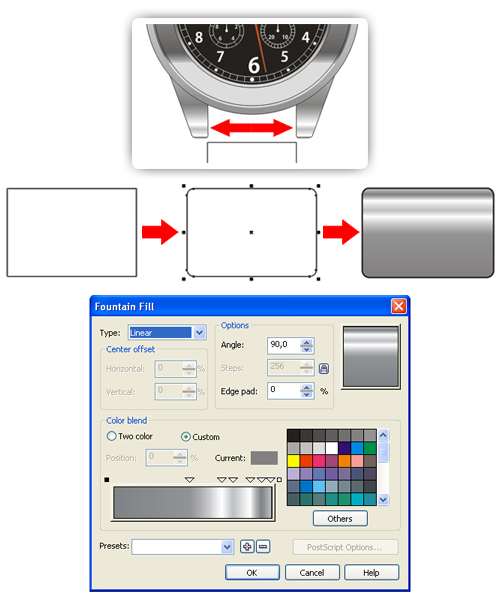
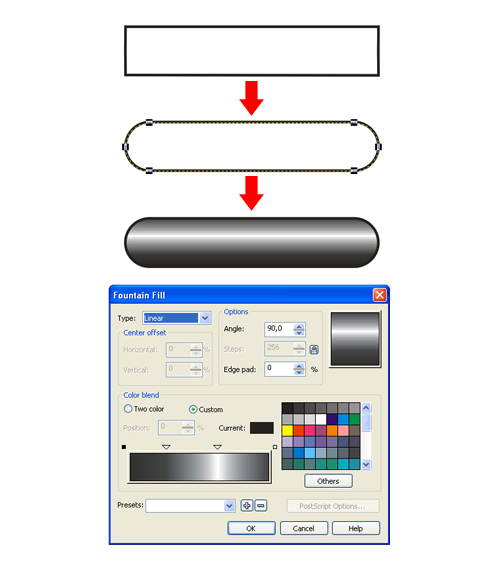
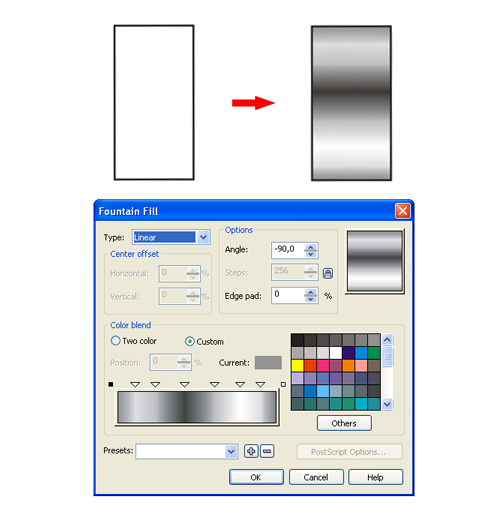
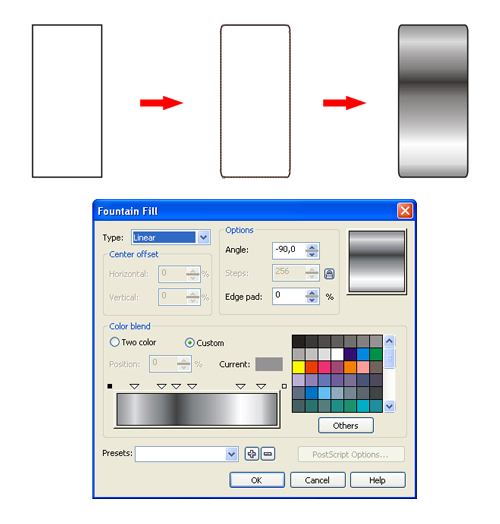
Now let’s make the steel strap. Create a 179 px by 291 px rectangle using the Rectangle Tool (F6). Then right-click the object, choose Convert to Curves (Command +Q). Change the shape using the Shape Tool (F10), shape the rectangle as shown. Fill with a Linear Gradient using the Fountain Fill Dialog (F11). Change the Angle to -90°.
Add seven sliders in the Gradient Slider. Set the color and position, Start point at 40% black, First slider at white; position at 3%, Second slider at 20% black; position at 11%, Third slider at white; position at 17%, Fourth slider at 20% black; position at 24%, Fifth slider at 50% black; position at 42%, Sixth slider at 20% black; position at 83%, Seventh slider at 20% black; position at 94%, End point at 30% black.
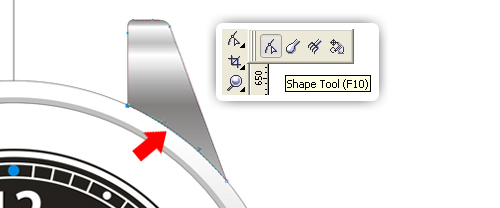
Place it at the top of the watch.
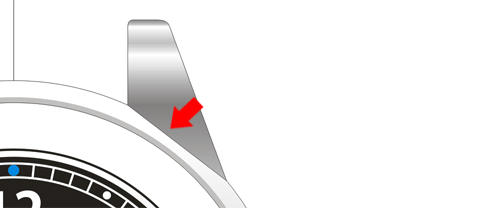
Fix it using the Shape Tool(F10).
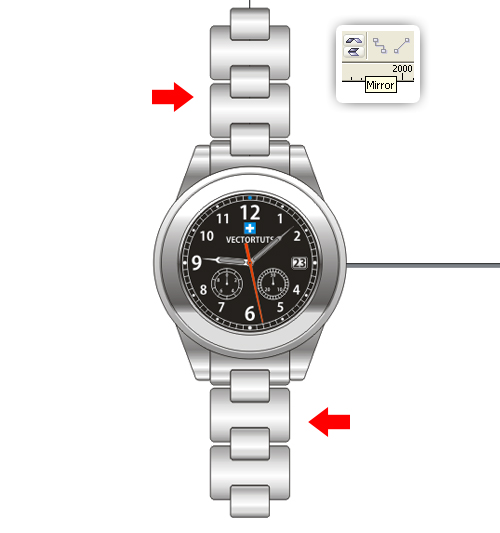
Step 22
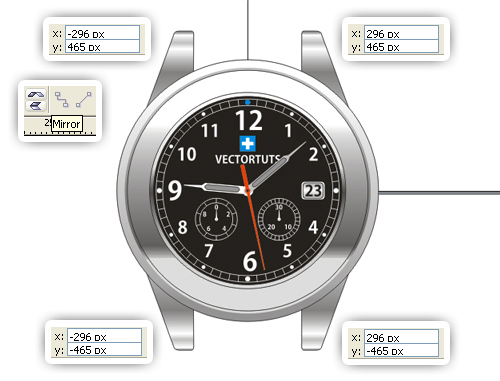
Duplicate it three times and put it to the position shown. For the first one, flip horizontally using Mirror, place the coordinate position at -296, 465. For the second one, flip vertically using Mirror, place the coordinate position at 296, -465. For the last one, flip vertically and horizontally using Mirror, place the coordinate position at -296, -465.
Step 23
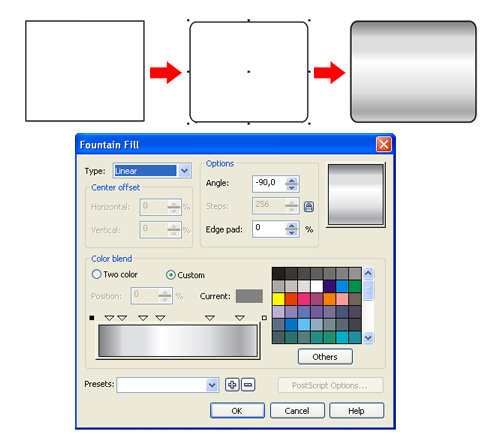
Create a 411 px by 279 px rectangle using the Rectangle tool (F6), make sure the width is fit with the last object (see picture below). Draw a rounded rectangle using the Shape Tool (F10). Fill it with a Linear Gradient using the Fountain Fill Dialog (F11). Change the Angle to 90°.
Add six sliders in Gradient Slider. Set the color and position, Start point at 50% black, First slider at 40% black; position at 48%, Second slider at white; position at 68%, Third slider at 20% black; position at 75%, Fourth slider at white; position at 86%, Fifth slider at 50% black; position at 93%, Sixth slider at 20% black; position at 99%, End point at 80% black.
Step 24
Duplicate the rounded rectangle, modify the Linear Gradient. Change the Angle to -90°. Add seven sliders in the Gradient Slider. Set the color and position, Start point at 40% black, First slider at 20% black; position at 12%, Second slider at 10% black; position at 23%, Third slider at white; position at 43%, Fourth slider at 10% black; position at 68%, Fifth slider at 20% black; position at 79%, Sixth slider at 30% black; position at 93%, Seventh slider at 50% black; position at 99%, End point at 50% black.
Step 25
Create a 202 px by 162 px rectangle using the Rectangle tool (F6), but now smaller by about 50% from before. Draw a rounded rectangle using the Shape Tool (F10). Fill it with a Linear Gradient using the Fountain Fill Dialog (F11). Change the Angle to -90°.
Add six sliders in the Gradient Slider. Set the color and position, Start point at 50% black, First slider at 30% black; position at 7%, Second slider at 10% black; position at 15%, Third slider at 10% black; position at 28%, Fourth slider at white; position at 39%, Fifth slider at 10% black; position at 70%, Sixth slider at 30% black; position at 89%, End point at 10% black.
Step 26
Arrange the position like shown below. Remember to use x,y coordinates position to get symmetric result. Order the large rounded rectangles to the back of page (Command + End).
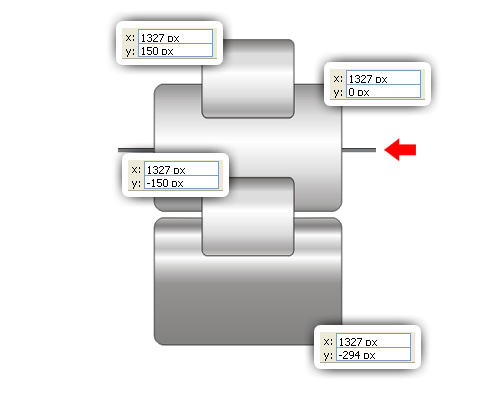
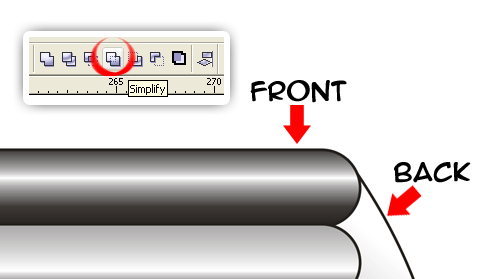
Select them all. Use the Simplify command in the toolbar. The small rounded rectangle will trim the large one.
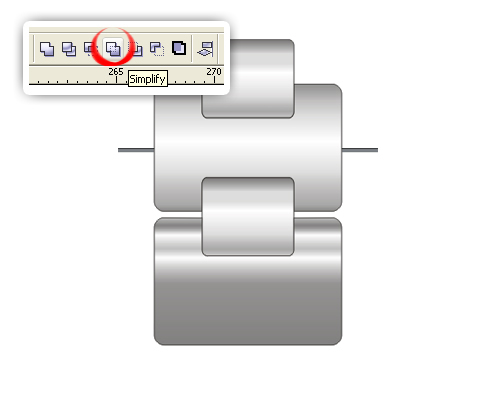
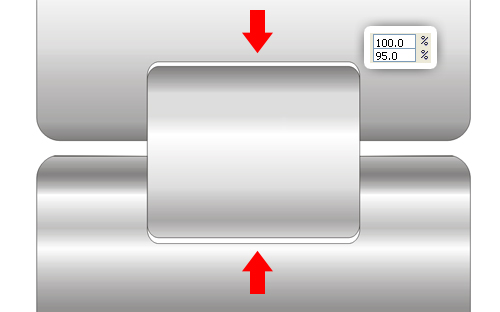
Select the small rounded rectangle, change the height scale to 95%, place it at the center between the two large rectangles. The result should be like this:
Place it at the top of the watch.
Fix it using the Shape Tool (F10). Do not use the Simplify command. The Simplify command will change the gradient.
You can Group (Command + G) the steel strap, then duplicate it. Flip it vertically using Mirror and place it at the bottom of the watch as shown.
Step 27
In the empty field, create a rectangle using the Rectangle Tool (F6), use the Shape Tool (F10) to create the rounded rectangle. Fill it with a Linear Gradient using the Fountain Fill Dialog (F11). Change the Angle to 90°.
Add two sliders in Gradient Slider. Set the color and position, Start point at black, First slider at 90% black; position at 26%, Second slider at white; position at 63%, End point at 90% black.
Duplicate the rounded rectangle seven times. For each rounded rectangle, modify the gradient randomly. Group (Command + G) them.
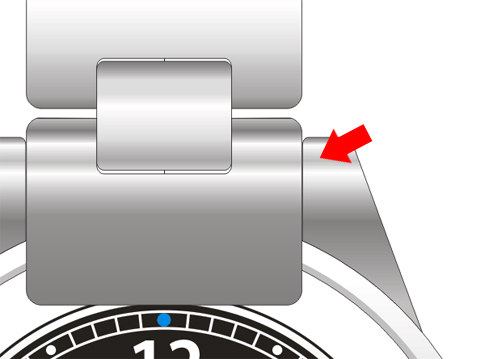
Step 28
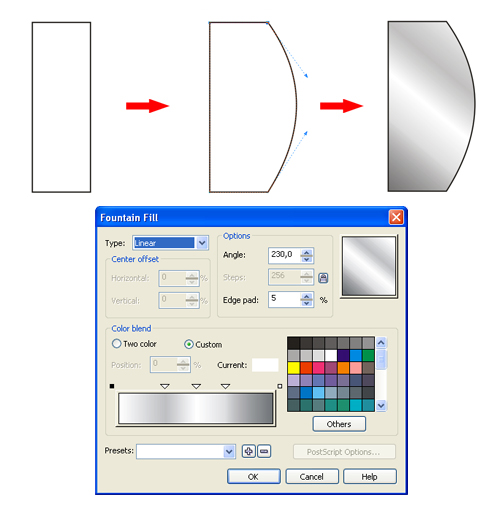
Create a rectangle using the Rectangle Tool (F6). Then right-click the object, choose Convert to Curves (Command + Q). Change the shape using the Shape Tool (F10) as shown. Fill it with a Linear Gradient using the Fountain Fill Dialog (F11). Change the Angle to 230° and Edge pad to 5%.
Add three sliders in Gradient Slider. Set the color and position, Start point at white, First slider at 20% black; position at 30%, Second slider at white; position at 50%, Third slider at 10% black; position at 70%, End point at 60% black.
Arrange the object with the rounded rectangle.
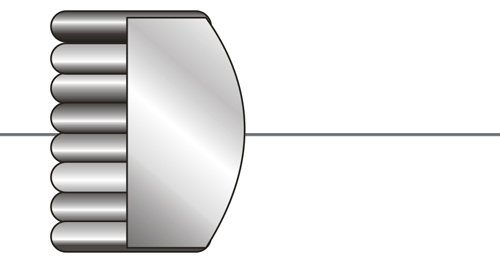
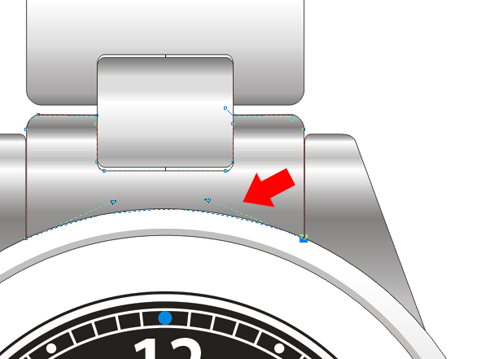
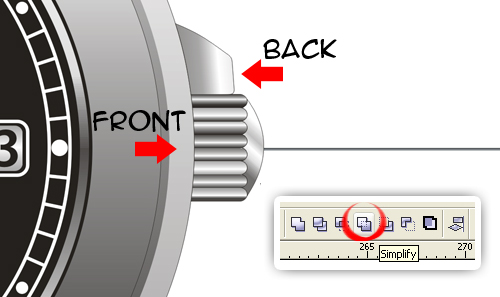
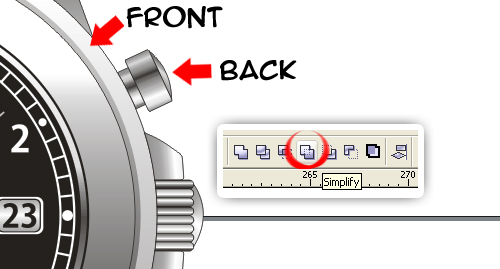
Order the object to the back of page (Command + End). Select them all and use the Simplify command in the toolbar.
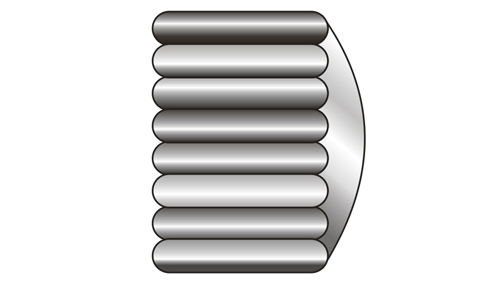
The result should be like this:
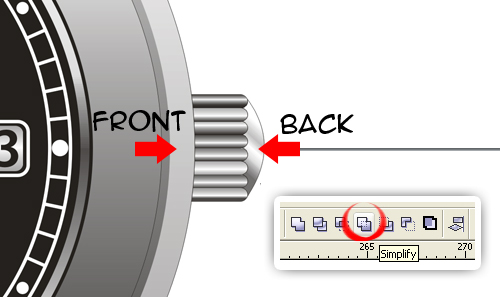
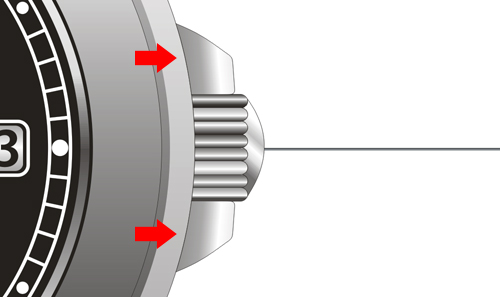
Place it at the right side of the watch, order it to back of page (Command + End). Select the object and the outer circle of the watch, then use the Simplify command in the toolbar.
Step 29
Next create a rectangle using the Rectangle Tool (F6). Then right-click the object, choose Convert to Curves (Command + Q). Change the shape using the Shape Tool (F10) as shown. Fill it with a Linear Gradient using the Fountain Fill Dialog (F11). Change the Angle to 5° and the Edge pad to 3%.
Add three sliders in the Gradient Slider. Set the color and position, Start point at 50% black, First slider at 30% black; position at 47%, Second slider at 10% black; position at 61%, Third slider at white; position at 69%, End point at 10% black.

Place it like shown below. Fix it and Order it to back of page (Command + End). Select the object and the outer circle of the watch, use the Simplify command in the toolbar. Duplicate the object and flip vertically.
The result should be like this:
Step 30
Now create a 38 px by 74 px rectangle using the Rectangle Tool (F6). Fill it with a Linear Gradient using the Fountain Fill Dialog (F11). Change the Angle to -90°. Add six sliders in the Gradient Slider. Set the color and position, Start point at 40% black, First slider at 10% black; position at 11%, Second slider at 20% black; position at 24%, Third slider at 90% black; position at 42%, Fourth slider at 20% black; position at 61%, Fifth slider at white; position at 77%, Sixth slider at 10% black; position at 90%, End point at 50% black.
Step 31
Now create a 47 px by 103 px rectangle using the Rectangle Tool (F6). Draw a rounded rectangle using the Shape Tool (F10). Fill it with a Linear Gradient using the Fountain Fill Dialog (F11). Change the Angle to -90°.
Add six sliders in the Gradient Slider. Set the color and position, Start point at 40% black, First slider at 10% black; position at 11%, Second slider at 50% black; position at 28%, Third slider at 90% black; position at 37%, Fourth slider at 50% black; position at 47%, Fifth slider at white; position at 77%, Sixth slider at 10% black; position at 90%, End point at 50% black.
Step 32
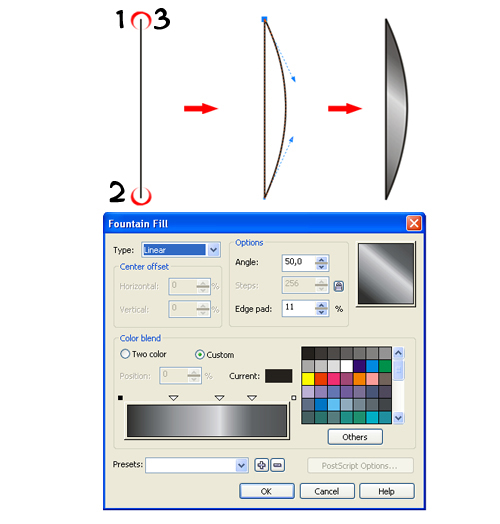
Create a 96 px vertical line with three point (see the picture below) using the Pen Tool. Modify the object using the Shape Tool (F10). Fill it with a Linear Gradient using the Fountain Fill Dialog (F11). Change the Angle to 50°.
Add three sliders in the Gradient Slider. Set the color and position, Start point at black, First slider at 40% black; position at 29%, Second slider at 10% black; position at 58%, Third slider at 70% black; position at 78%, End point at 80% black.
Step 33
Put the three of them at the same y coordinate position, arrange them as shown. Then rotate about 25° and Group (Command + G) them.
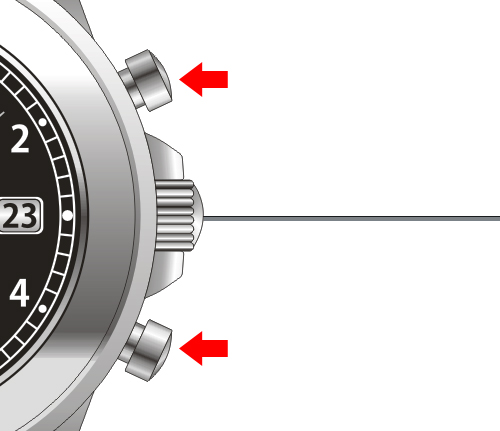
Place it at the right side of the watch like shown below. Order the object to the back of page (Command + End). Select the object and the outer circle of the watch, use the Simplify command in the toolbar. Duplicate the object and flip it vertically.
The result should be like this:
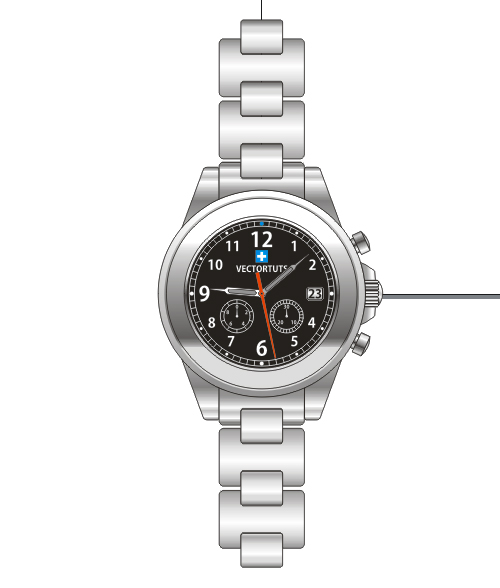
Your wristwatch is done.
Finish
See more our tutorial here